Create your own songs for Dummies

After Reading aashideacon’s thread How to create “with bass” BB songs on a Mac (Please have a look through his thread in conjuction with this one) I though I would try to create a step by step guide for creating your own songs and try to make it as simple as I can. I will only be making the occasional song from now on but would like to see more users creating there own.
This thread make take a bit of time for me to complete.

This Thread is quite big so I will start a seperate thread here for adding bass to songs.

First thing I will do is use a midi editor to create a drum beat. The first program I would recommend is Beatbuilder[/URL] by Charles Spencer. Myself I use [URL=‘http://www.reaper.fm/’]Reaper to create songs and find it very powerful and easy once learned. It has a trail period then is $60 but well worth it in my opinion.

For This Example I will use a program I have found called MuLab[/URL] which has a free version which is feature limited but will work with midi editing. Download the program [URL=‘http://www.mutools.com/mulab-downloads.html’]here.

Now I am going to try and make this as easy to understand as I can so don’t be insulted if you think some of my instructions insult your Intelligence. Even smart people can spend hours stuck on the seemingly easiest of things.

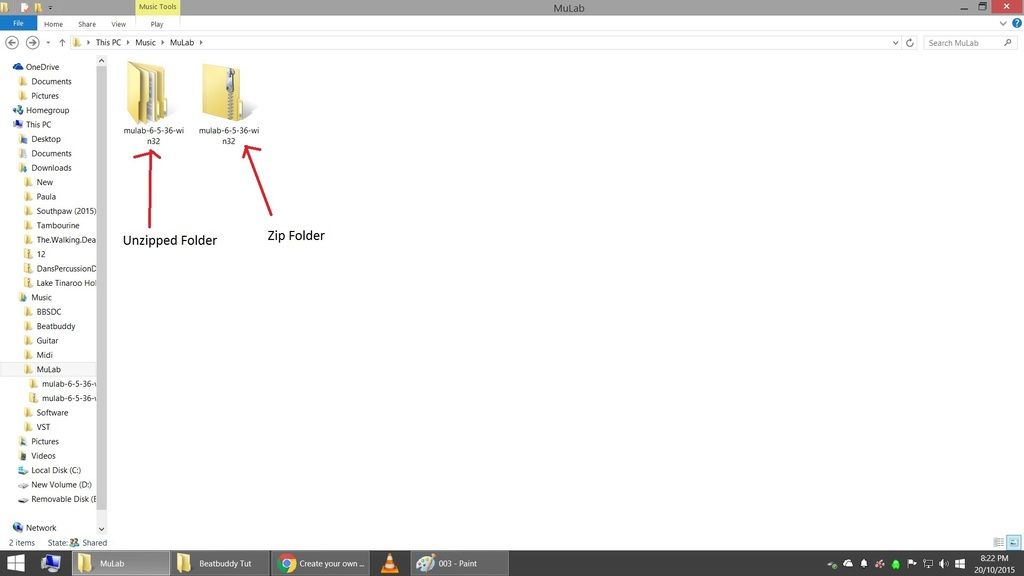
Now when you download from MuLab you will need to save the zipped file to a folder on your hard drive. I normally automatically save to a download folder but here I have saved to a folder I have created Labeled MuLab

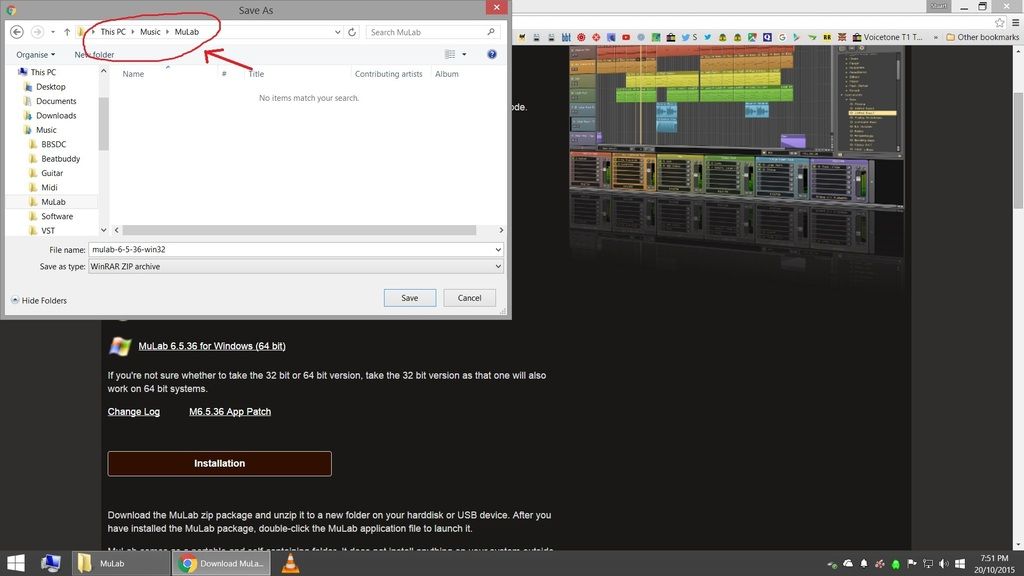
Now You need to unzip this folder using an unzip program. I unzip mine into a folder with the same name ends up like this.

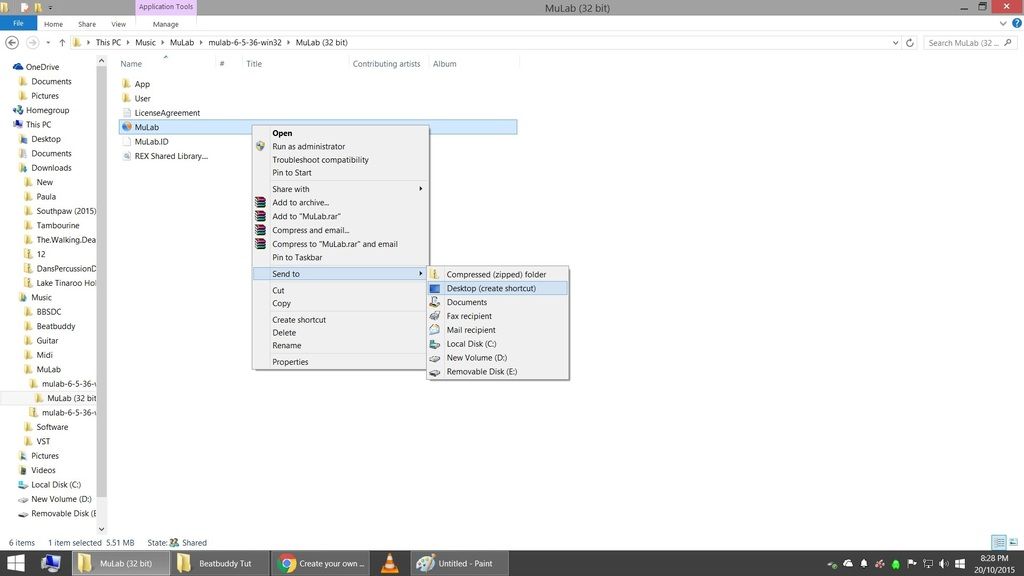
In the Unzipped folder you can find and click on MuLab to start the program. I also create a shortcut to desktop.

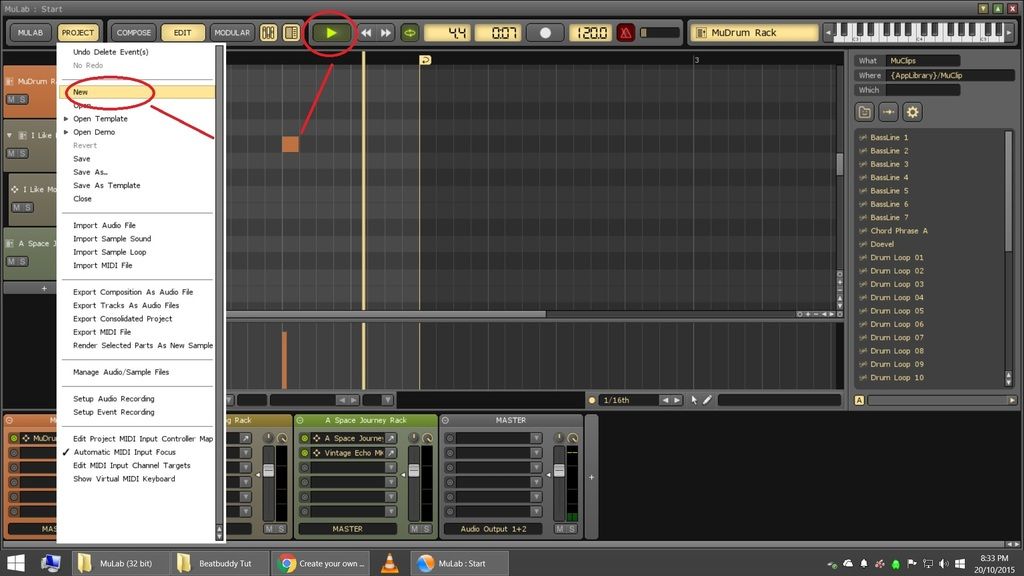
Now after starting just click ok etc through I agree and sound screen and program starts. It seems to have a preloaded clip we want to get rid of so select the project tab and then new. It will be in play mode. Just click the play button to stop.

In front of us now is where we will create the midi file. First we need to select an instrument to get some sounds when we play back our midi file. The program has some drum instruments but I don’t know if they are mapped to the right notes so I will download a drum vst pluggin[/URL]. Download the [URL=‘http://www.powerdrumkit.com/download76187.php’]MT Power Drum Kit selecting the appropriate operating system and 32 or 64 bit. Same procedure as downloading the MuLab file.

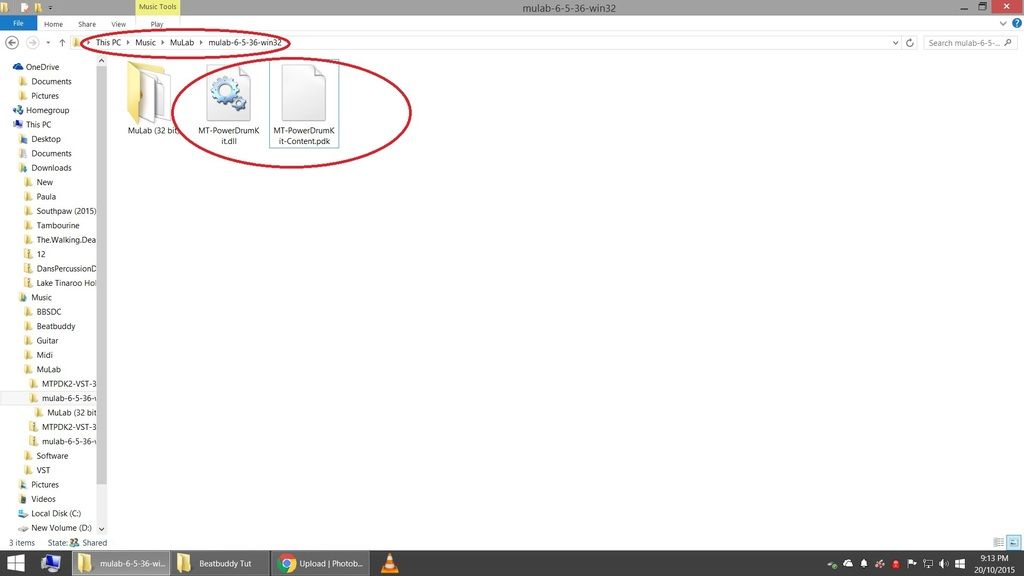
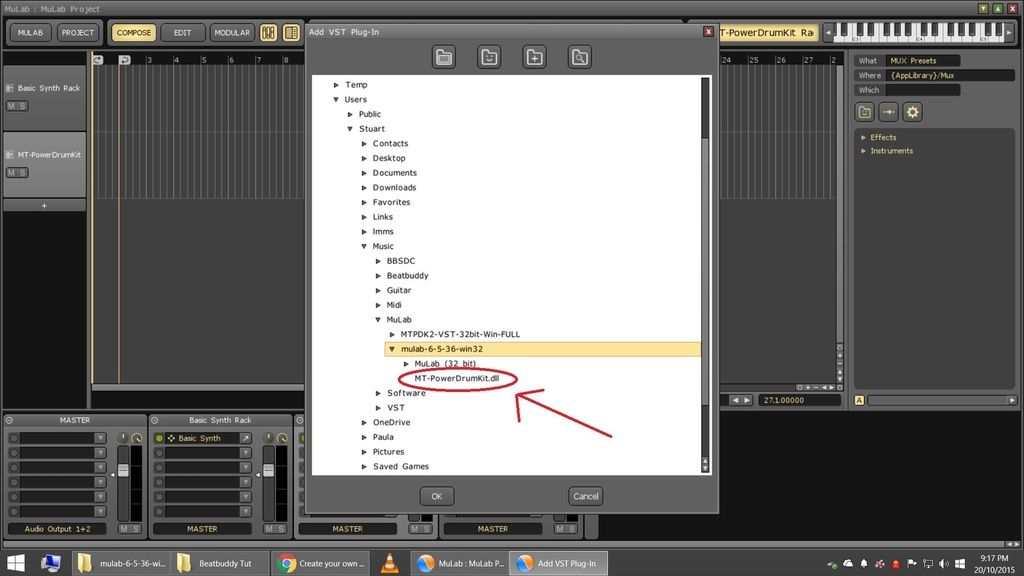
Now when you open up the unzipped folder there will be a file with extension .dll and a file with .pdk. Copy these files and then paste it in the same page as the MuLab folder.

Back in the MuLab program we have to click on the instrument section in the top right corner, In the menu then select VST and then browse for VST pluggin.

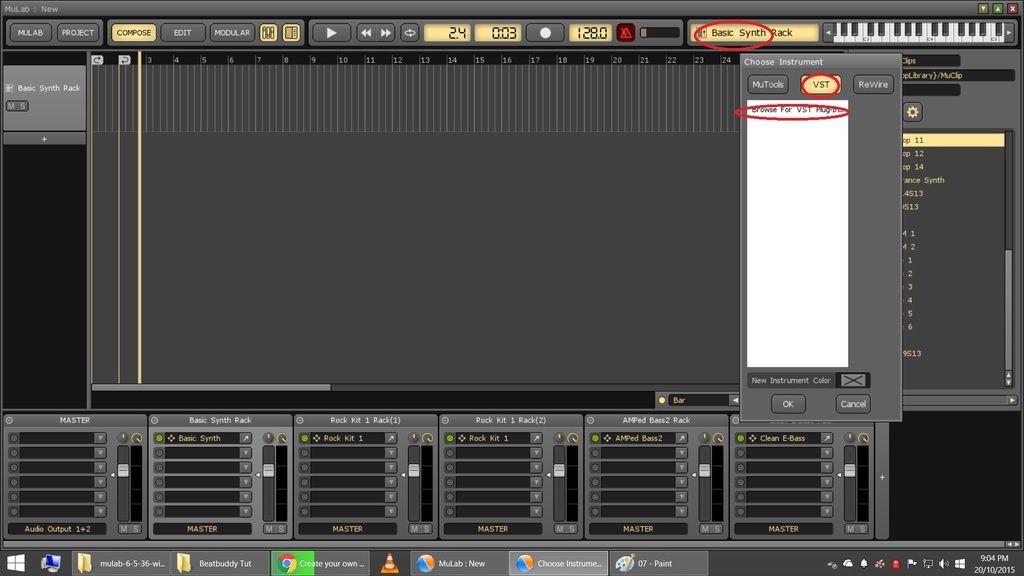
Then Select the .dll file you just pasted to the MuLab folder

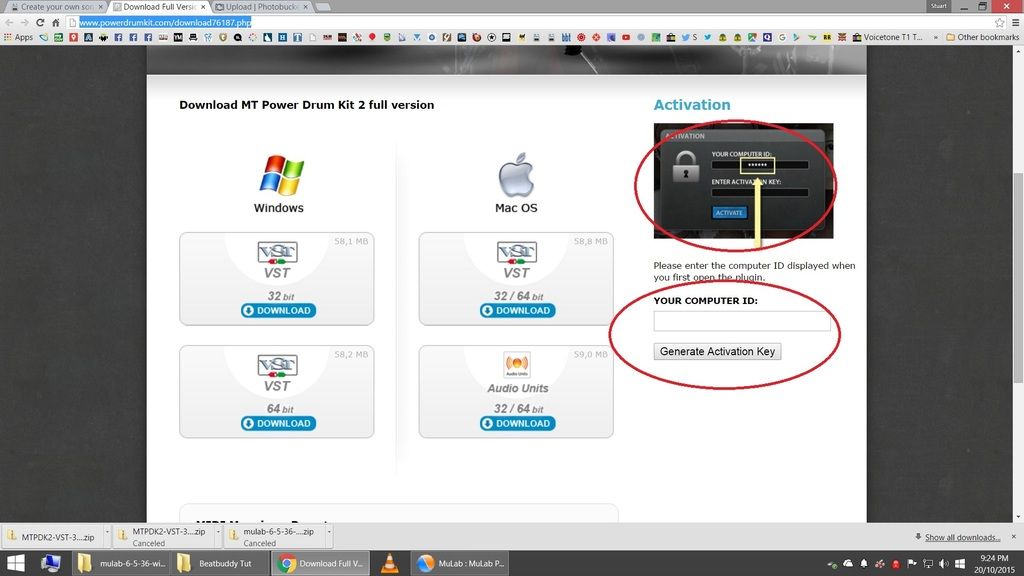
The first time you do this you will have to Activate the drums. Go back to the MT Power Drum download page, enter your computer number as is shows and get your activation key.

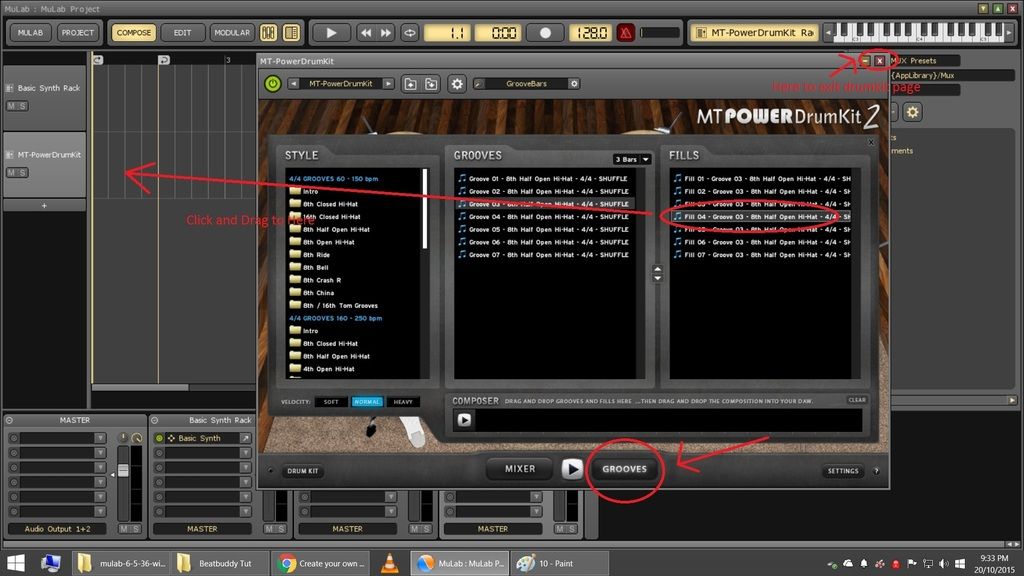
Now we are going to clear the page with the drumset display off the page for now.
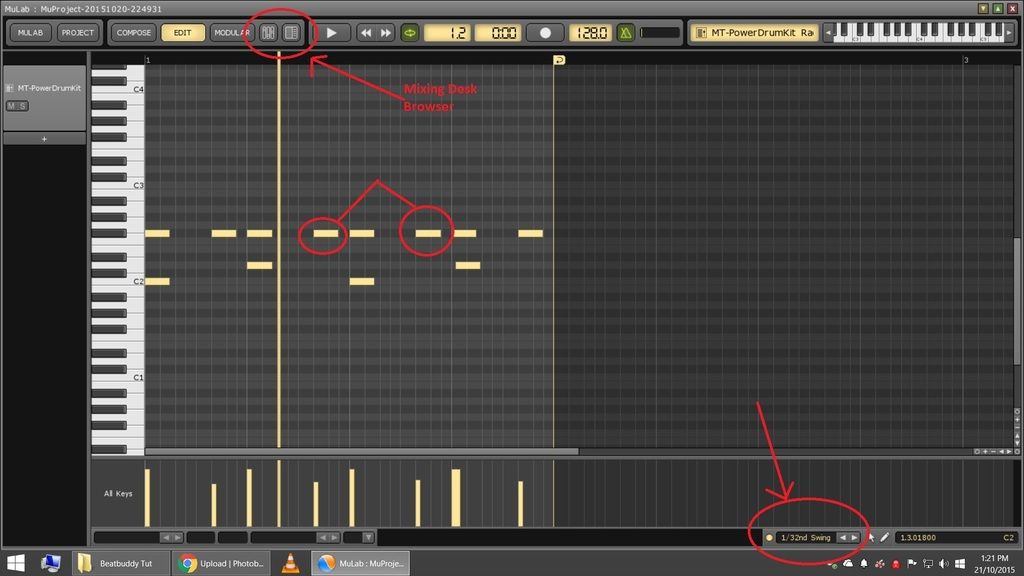
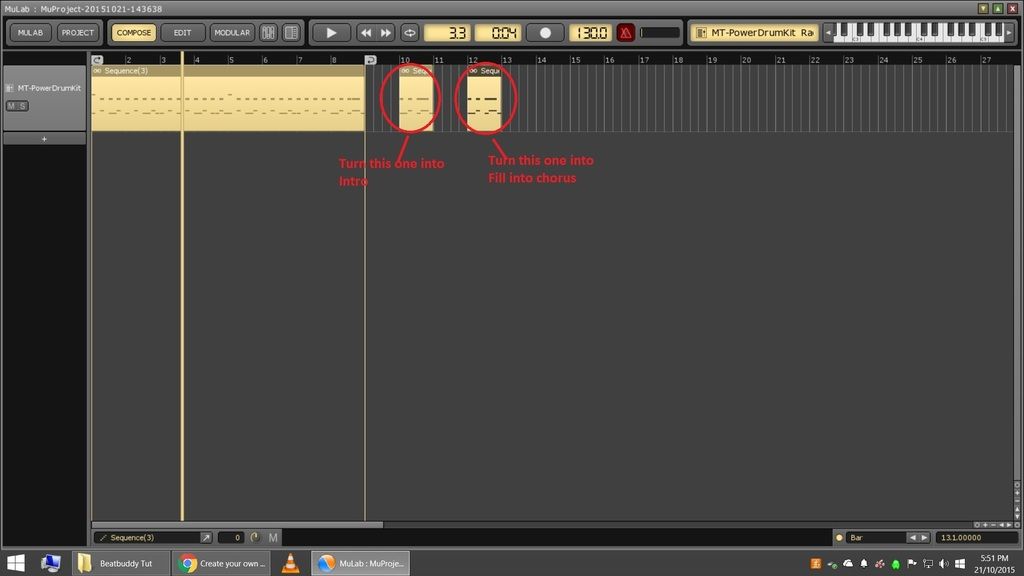
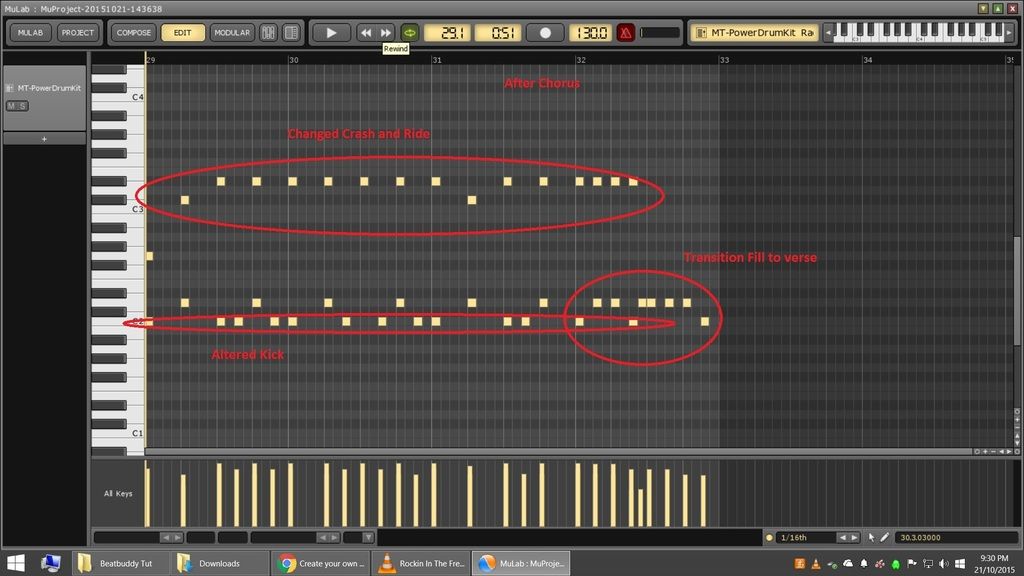
Advanced: There is the opportunity if you are looking for beats and fills to click on “Grooves” under the drumkit. You can then select a beat or fill and drag it across in to the track in the midi area.

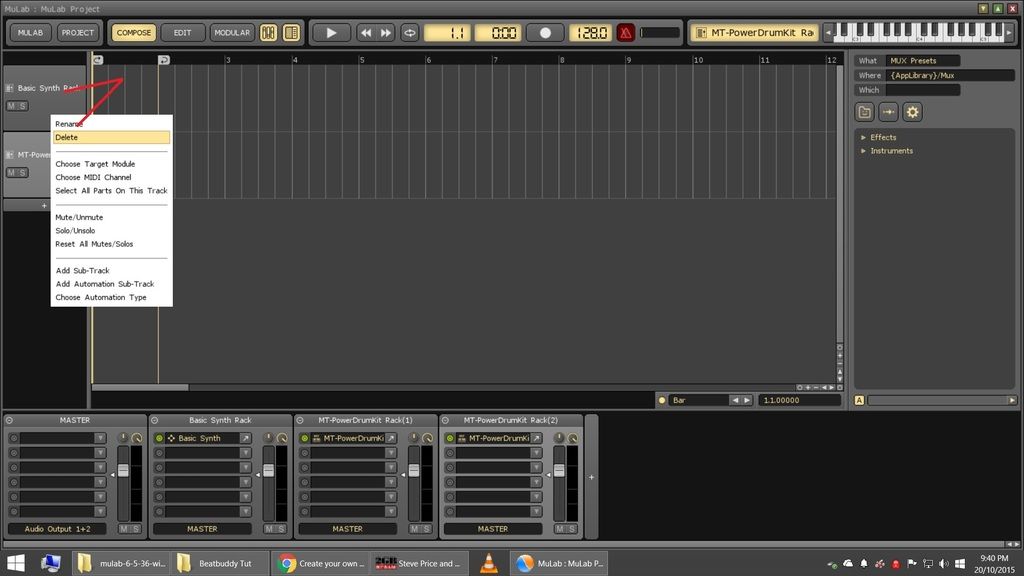
Right Click on the “Basic Synth Rack” track to get rid of it.

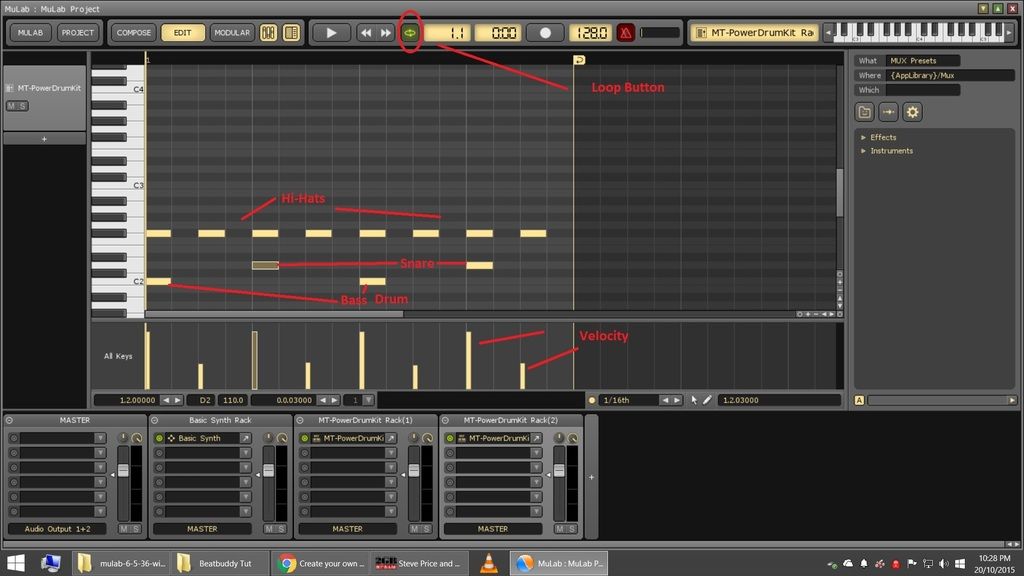
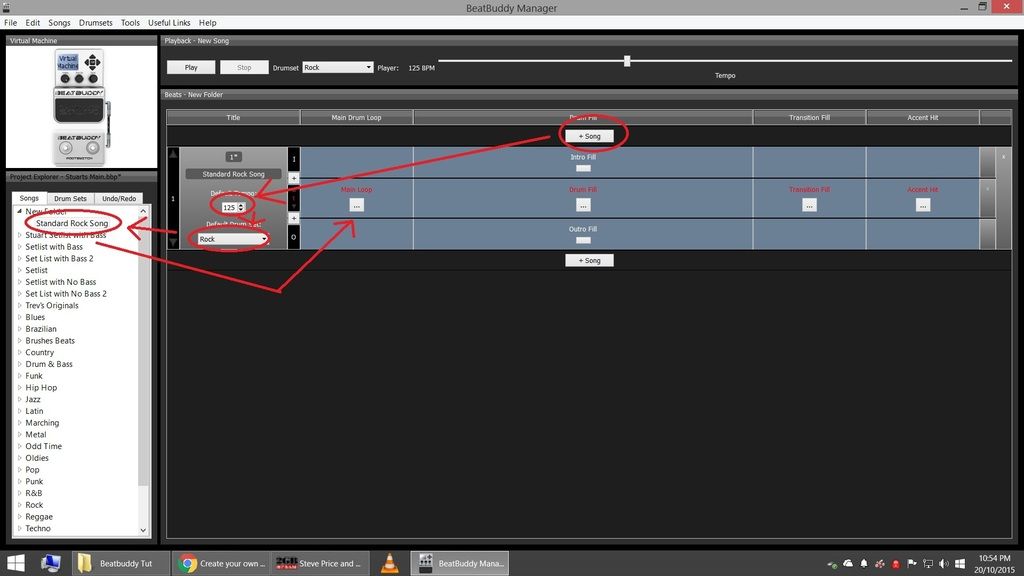
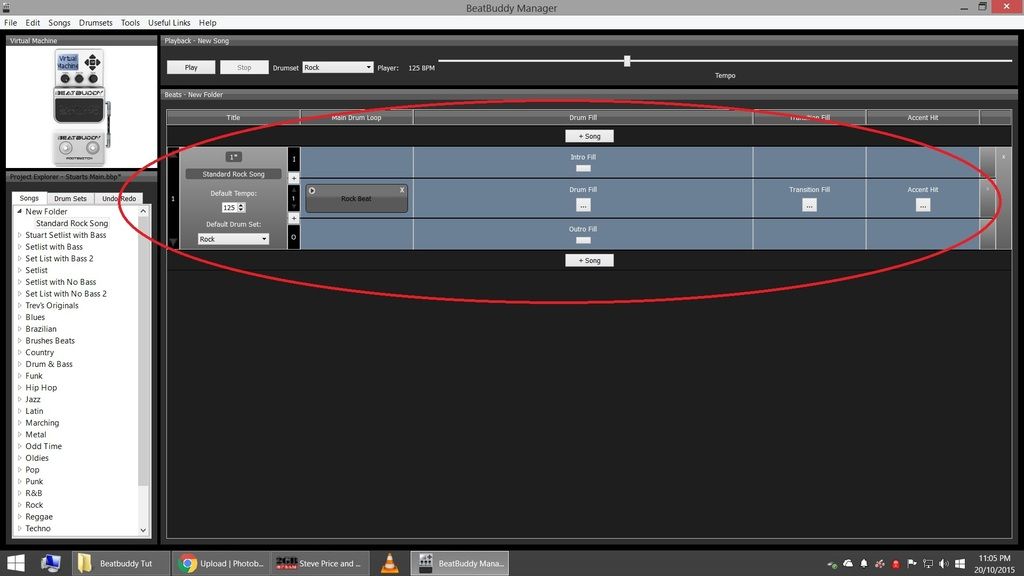
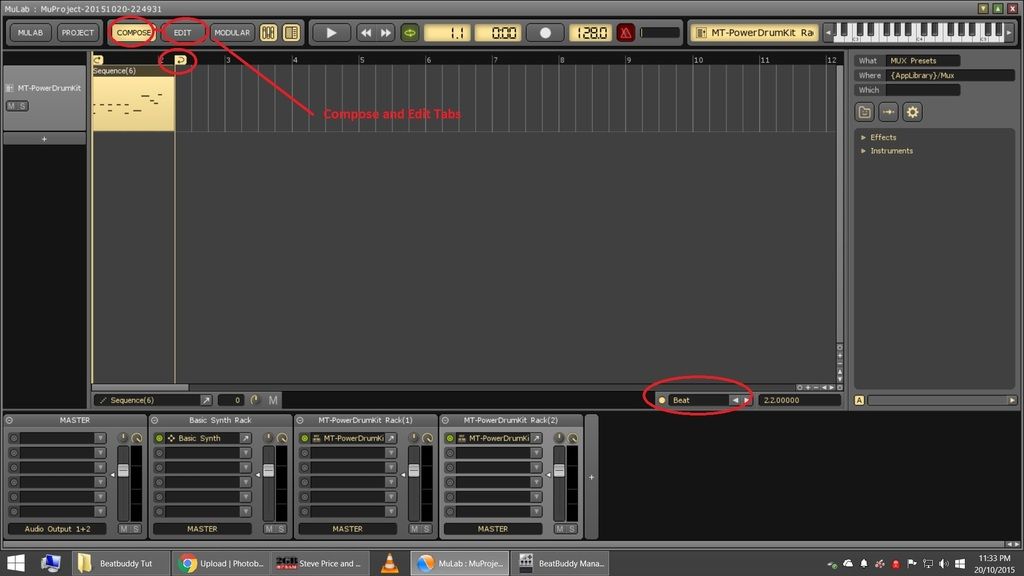
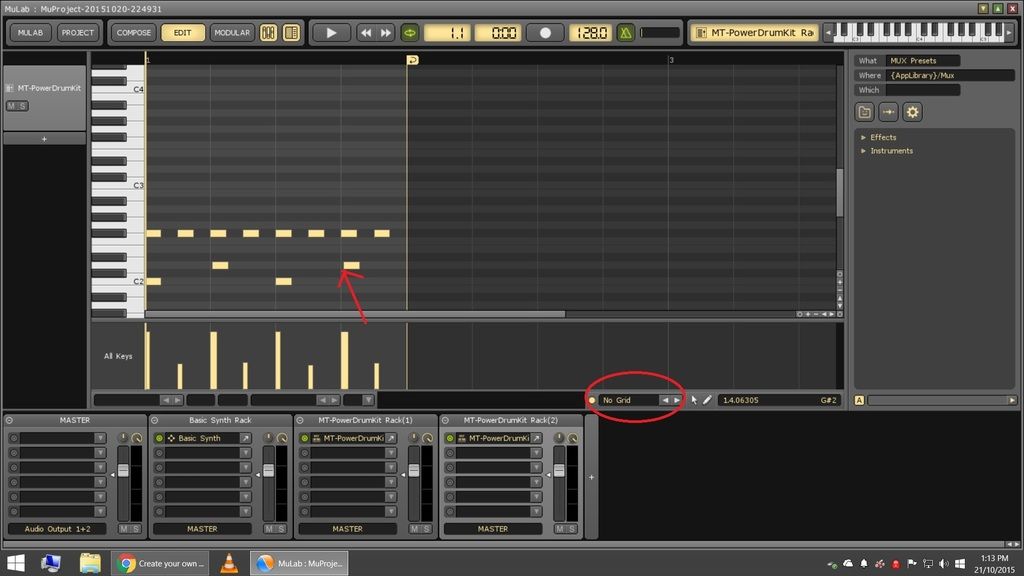
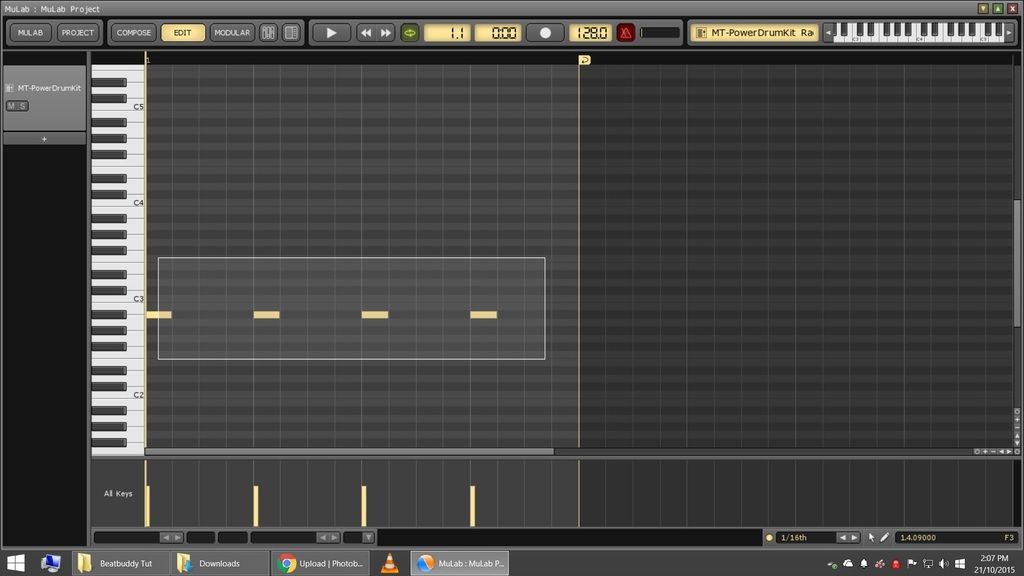
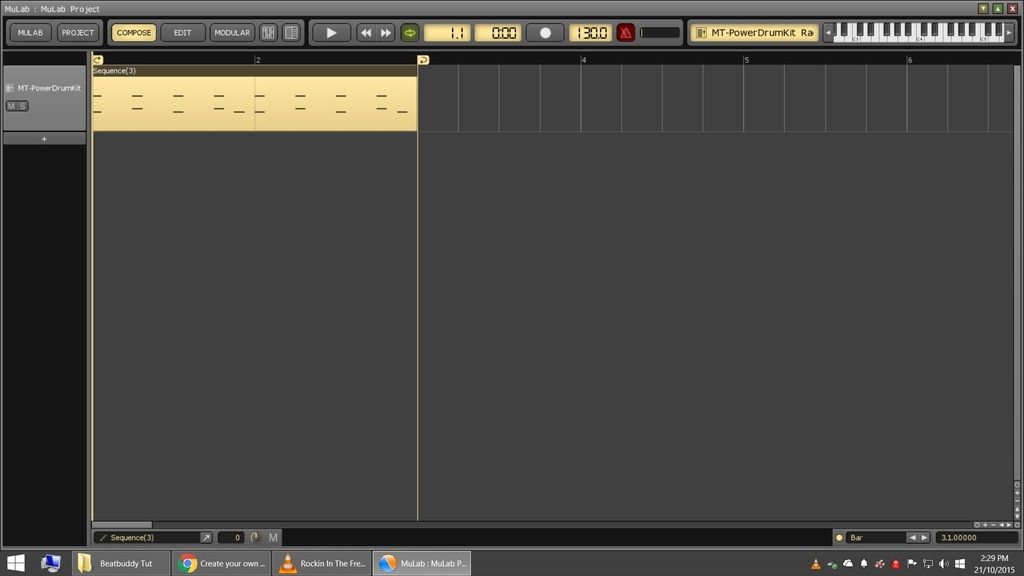
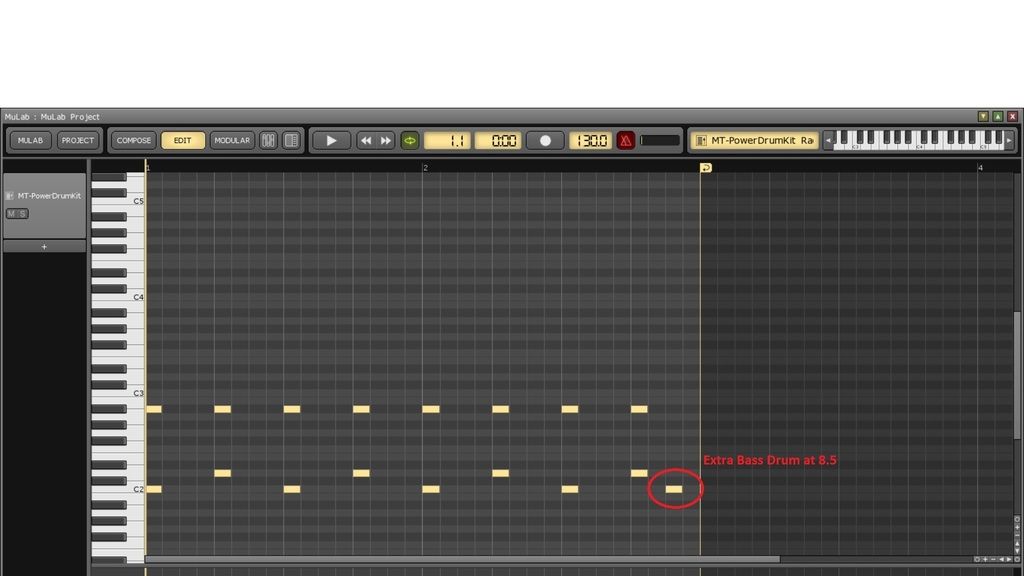
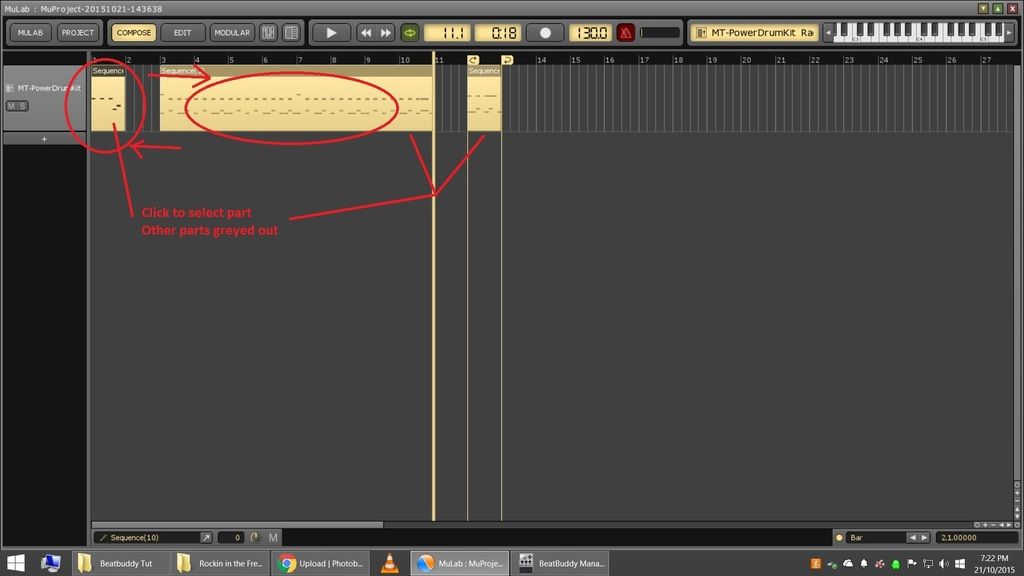
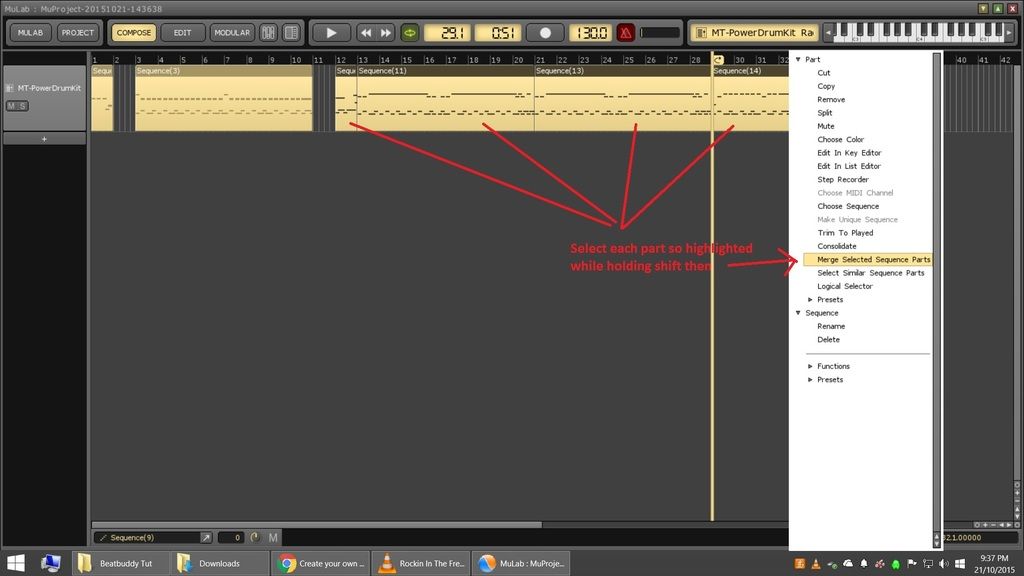
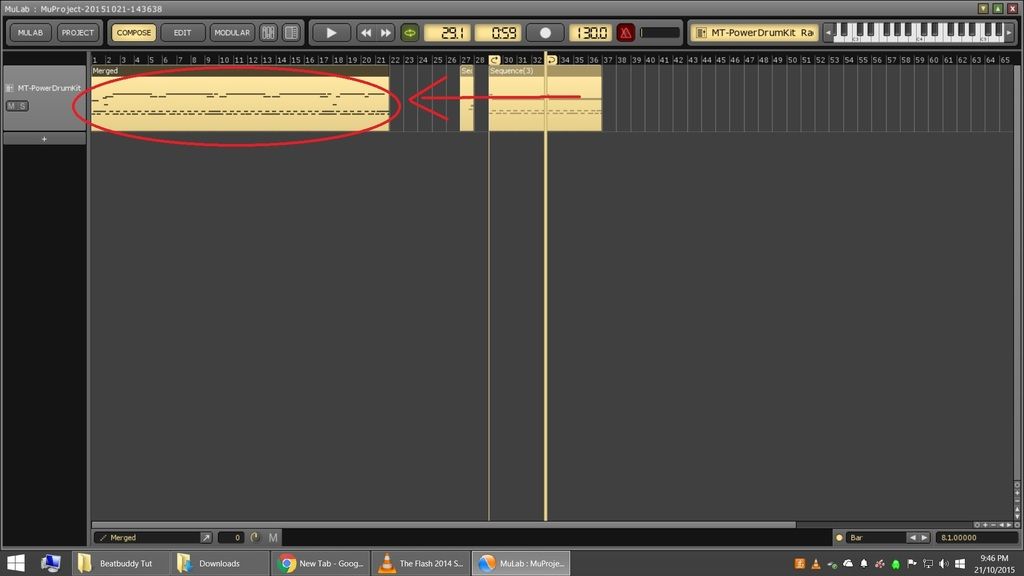
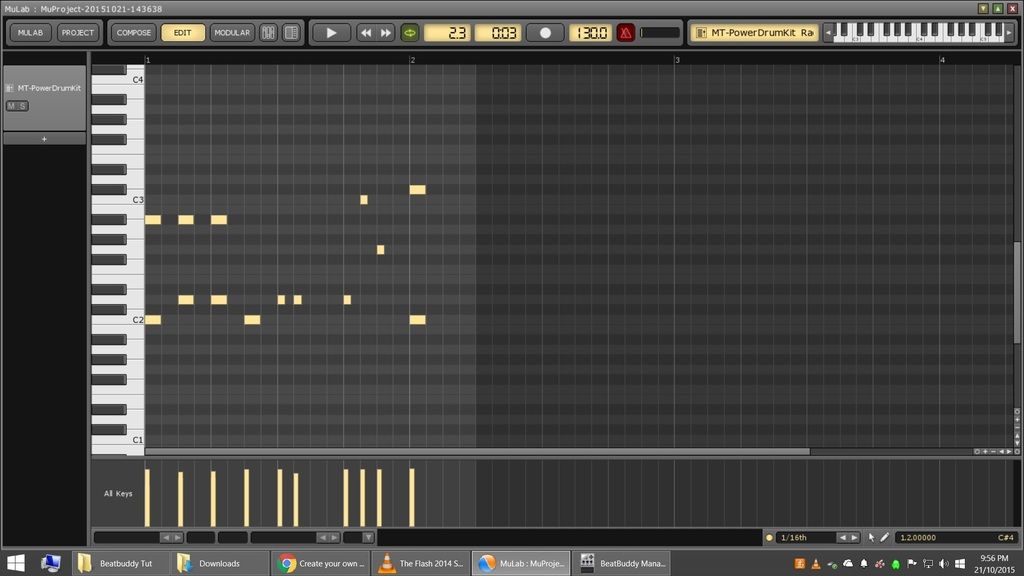
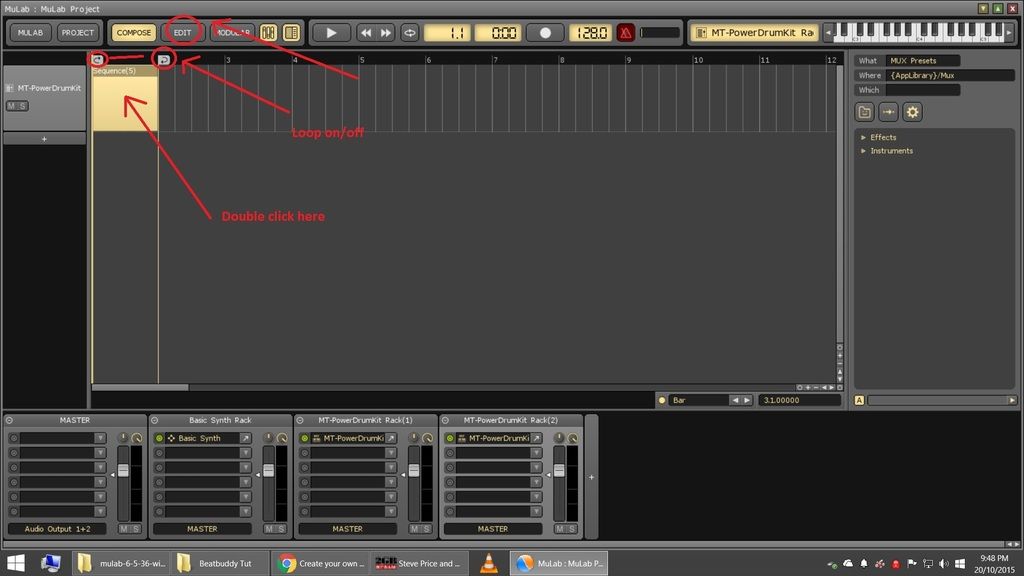
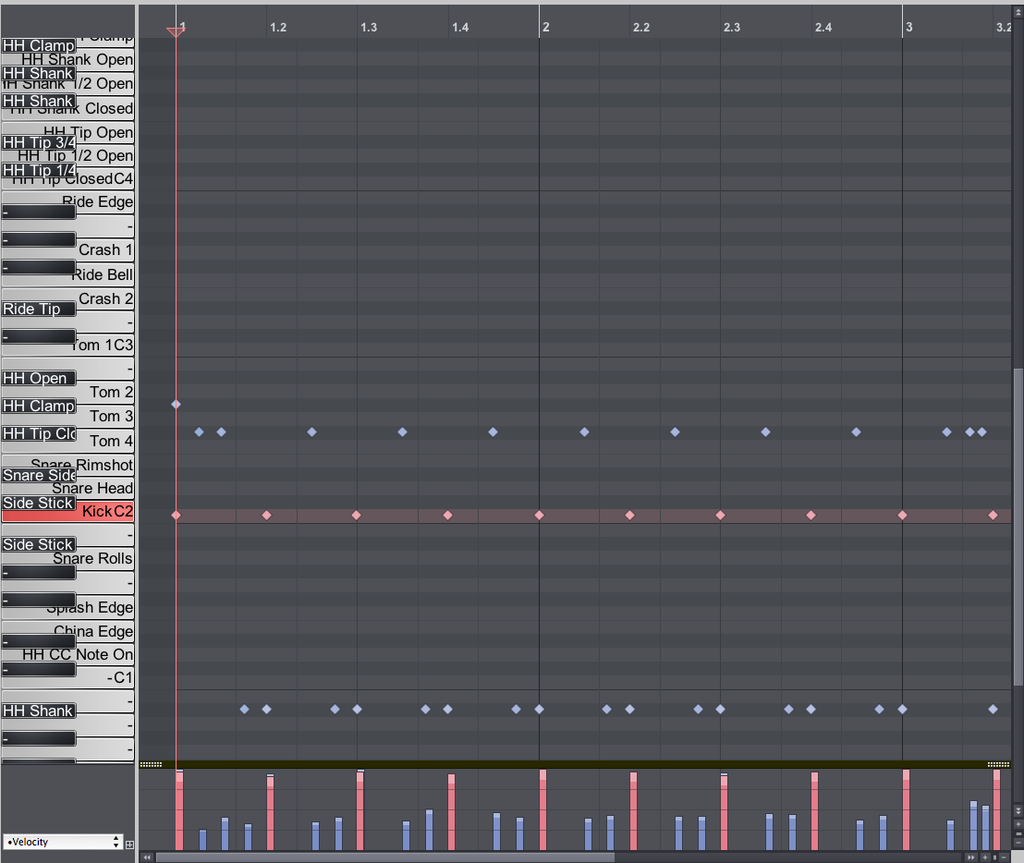
Now we are ready to create a beat. I will first create a basic 4/4 loop. You can set first off how long you want your loop or part to be by moving the loop on/off icons. Then double click inside the loop to create a midi section and then click the edit tab.

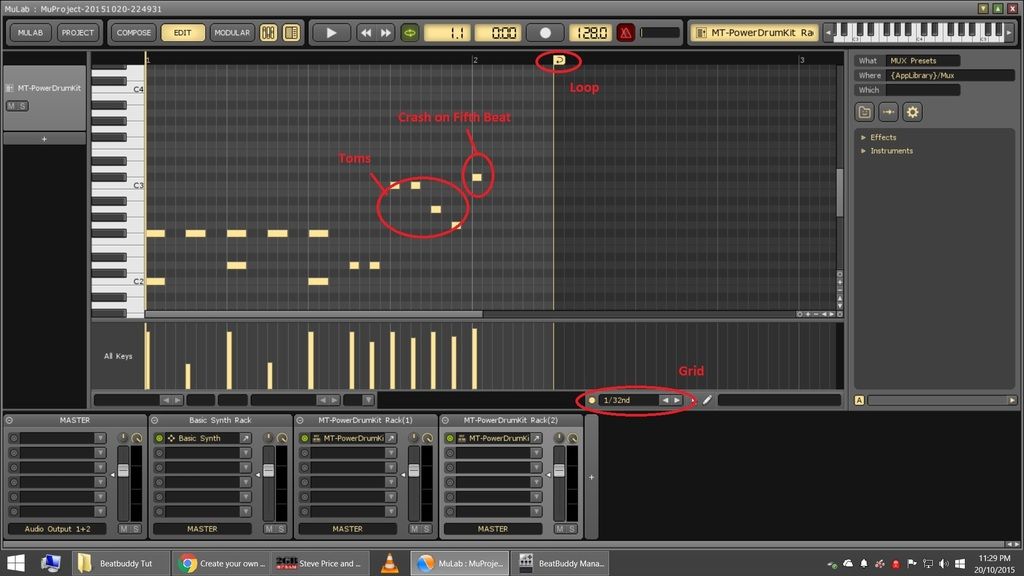
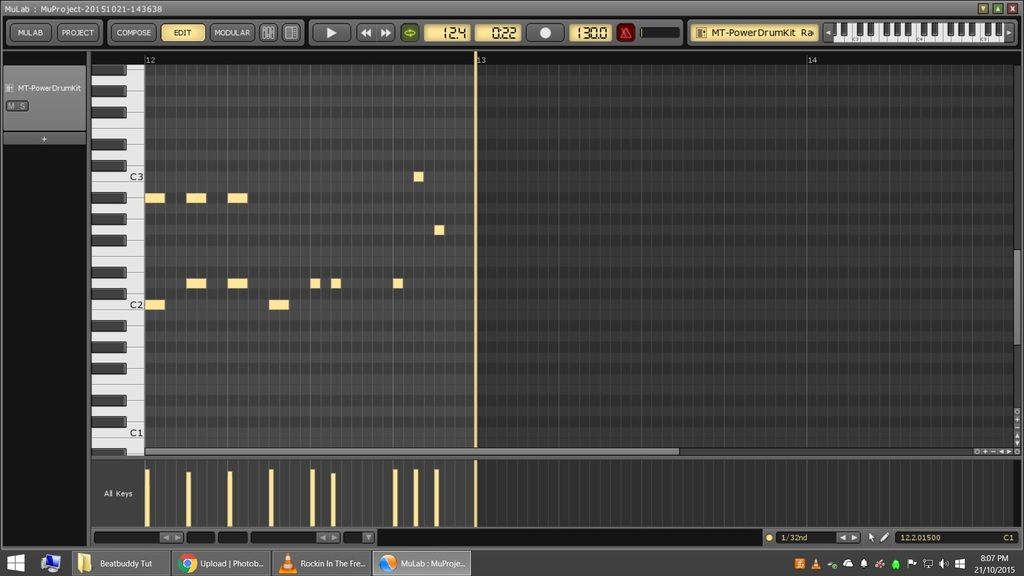
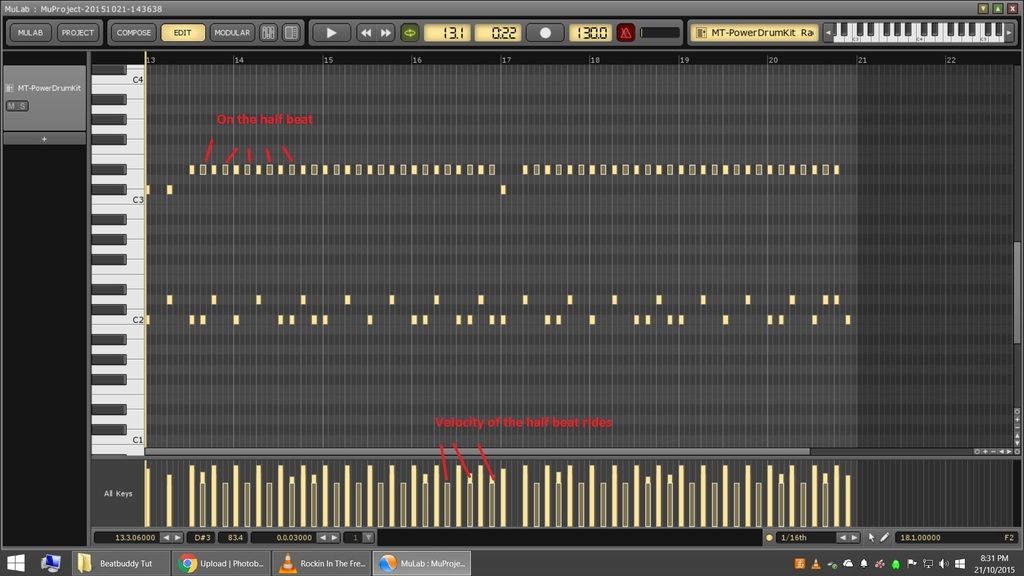
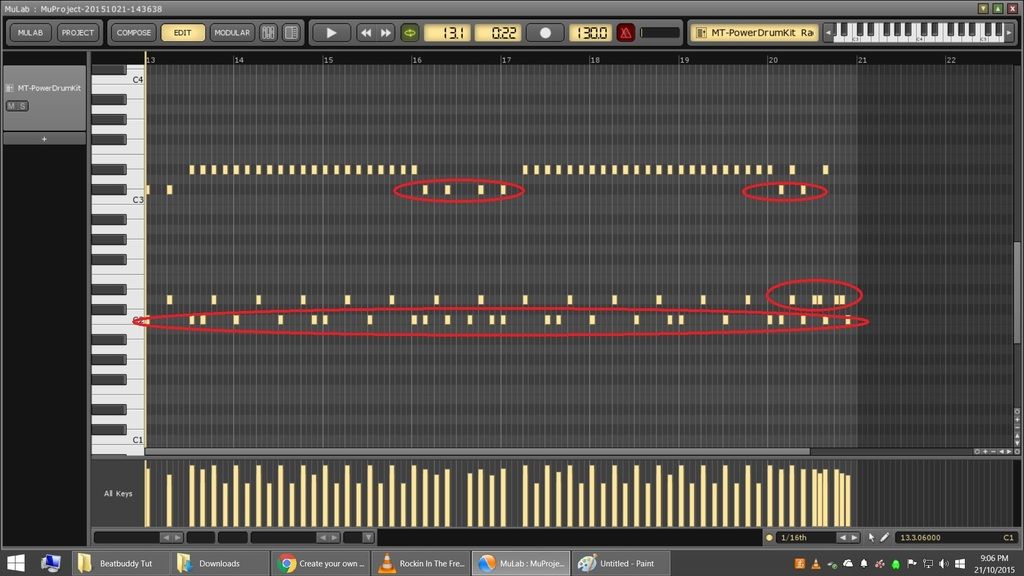
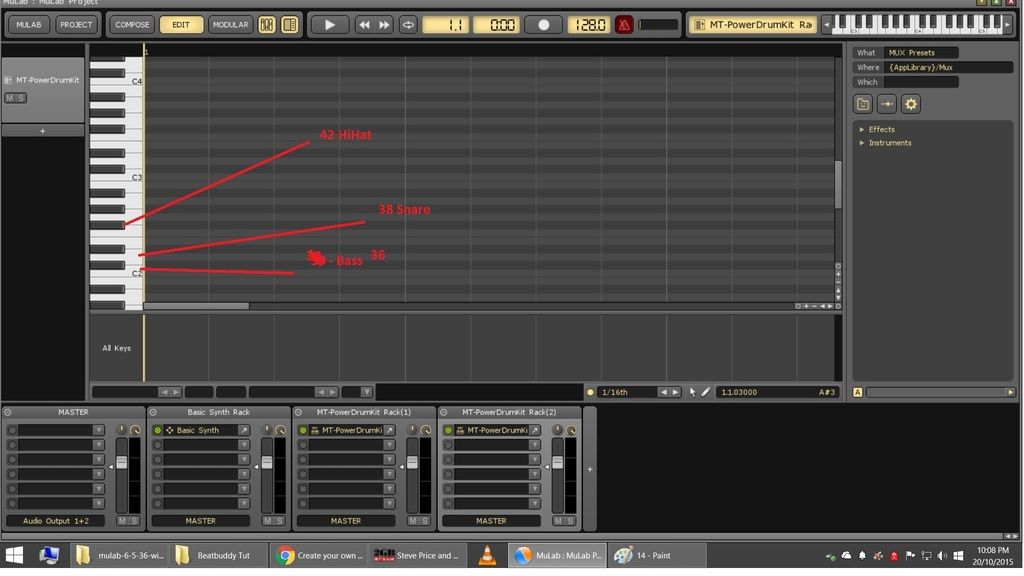
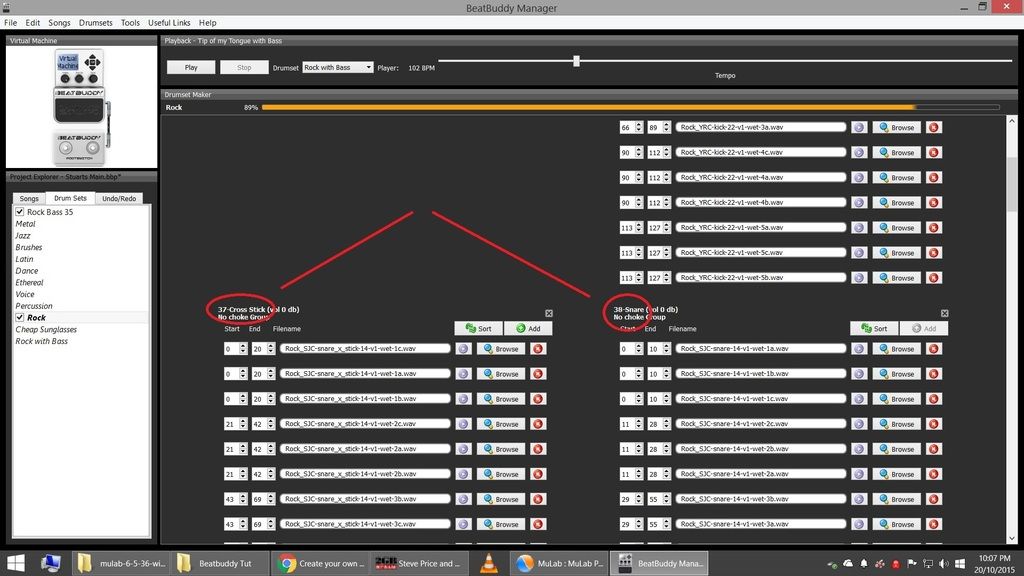
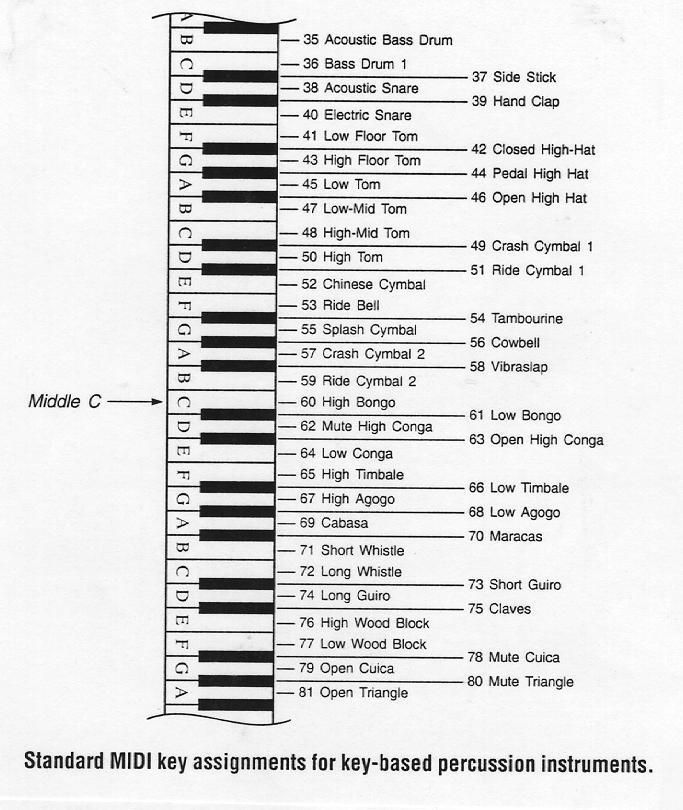
This will bring up the midi editor with the piano roll down the left hand side with lettering such as C1, C2, C3 etc. These notes on the piano roll will align with the different drum sounds we want to trigger (bass, snare, crash etc) and it will greatly help you out to become familiar with this. In Beatbuddy Manager when you open up a drumkit for editing you will see midi numbers in the name of the instrument that will line up with a note on the piano roll. Eg. Bass drum is C2 (36), Snare is D2 (38), HiHat is F#2 (42).


Last one is upside down.

Now we Can Create a basic 4/4 beat. On the beat 1 and 3 we will add Bass Drum notes, on beat 2 and 4 we will add snare hits and on every beat and half beat we will add a Hi-Hat. Press play and you should hear the beat. If you don’t hear anything you might have to press the rewind button to get back to the start to play. Double click to add a note. To delete click once on the note you want to delete and hit delete key. To move a note put in the wrong spot click and hold on the note then you can drag it around.

While doing this we can also change the velocity or volume of the note. This is the long straight lines under the midi pattern. One click select the note then drag the long straight line to velocity level required. In this example I will halve the velocity of the Hi-Hats on the half beat. Press play to preview. You can also click the loop button near the play button to play your midi file in a loop.
You can also change the tempo in the box above loop button writing where it says 128.

I will show some more features after but for now we will export this beat to midi file and create a song with it in beatbuddy manager.

Now click the project tab then select export to midi. Find Yourself a folder to export to and remember where it is as we will need to recall it in beatbuddy manager. I used the create folder to make a new folder and then name the file.


Now it’s time to open up beatbuddy manager and create a song. Just for this exercise I created a new folder to put the new song in but you can add song to any folder.

Then click “+ Song”, Set the tempo, set the drumset, Name the song, and then click on Main Loop.
Now you must relocate the midi file you created in MuLab. Double click on it and done.


You can now go back to MuLab and make up some fills, Make another loop with ride instead of high hats for part 2 in song etc. Here is an example of creating a fill by throwing in some snares and toms. You will notice I also changed the grid size so I could put more notes in a smaller area.
You will notice the beat is now five beats long. If you add a crash on the fifth beat it will add a crash when it goes back to the main beat but wont change the timing. To do this you have to change the grid size to beat instead of bar in the compose tab up the top left corner and move the loop one bar and do the same in the edit tab


A Couple of other little tips. In the grid option box you can set it to no grid and it allows you to move the beat off centre to get a more human feel. With the grid on new notes will always snap to grid. There is all so the option to set the grid to a swing feel If you are after that kind of beat. I Haven’t looked into setting the time signature with this program yet. You can toggle the mixing desk and browser option for a bigger midi area.

Bass to come and a more complex song

Now I am going to Create a beat for Neil Young - Rockin in the Free World .
I am going to do a beat from scratch as a demonstration. You can also download full band midi’s as discussed in aashideacon’s thread and cut it into loops. I may post instructions for this after making one from scratch.

I am going to add bass to this as well which will affect how long my loops are.
After listening to the song it is basically a mix of a verse loop and a chorus that has a lot of fills in it. I plan to just create a verse loop as the main song part and make the whole chorus a fill. I will be able to trigger the chorus when I want. It will play out and come back in to the verse loop. How complex you make your beat is up to you and how long you want to spend on it. If making a song with drums only you can make your loops smaller and transition say from a verse loop to a chorus loop etc. When using bass you have to be a bit more inventive.

Start with the Verse Loop.
To get the beat you can sit down and just listen to the song and work out when the hi-hats, Bass drum, Snare etc and start inserting midi notes and get the loop to sound the same just using your ears. Where possible I like to download a youtube video of someone playing the beat so I can see whats going on. The accuracy of what’s available can vary and I listen to a couple and pick the one I like. I have chosen this one to model my beat off. I will use VLC to play back the clip in a loop on the section I want to learn.

For a start I am going to create a beat that is 1 Bar long then extend it out to two bars after making a basic beat. First Thing I am looking at is the HiHat. He is playing the hihat on the beat only not the half beat and it is open to get that ringing sound. The you will notice if you look at the piano roll diagrams or the drumset midi numbers in Beatbuddy Manager the open hihat is A#2 or #46. In the Beatbuddy playback the open hihat will be quite loud so I will reduce the velocity of the notes. This may happen when you create a beat in a midi editor the levels sound different in beatbuddy playback and you may have to go back and change the velocitys. So you don’t have to change all velocitys seperately you can left click and drag a box across the all the notes to select all then change the velocity or hold down shift and select the notes for say if you only wanted every second note.

The Snare is just playing every second beat.

Forgot to set the BPM. I am going to set it to about 130.
Now I add the bass drum. This is where alot of rock songs get their groove from. This example the bass drum is played on the 1 and 3 beats with a bass drum on the say 8 1/2 beat before looping. So now I am going to extend my loop a bar. First in the compose section and then in the Edit section. In the edit option that comes up I will click repeat to double the length of the beat.


If Your Just after a simple loop you could export this to midi as is and start creating the song in Beatbuddy Manager. What I’m gonna do is make this beat a bit more interesting is I am going to extend it out to eight bars long. I’m gonna swap the hihat for a crash at the start of bars 1 and 5. I’m going to add some more kick drums to give it a bit more drive. These extra kicks are present in different parts of the song. And I’m going to put in a small signature type fill at the end of the extended loop. Export to midi and then create new song in Beatbuddy Manager


I am going to add a small intro with a hihat count in and fill on the last beat. I can do this in the same project on MuLab by in compose by double clicking in the space after the first beat to create a new midi file. This can be extended by dragging one end to make it longer. You can also right click in the numbered bar above to relocate loop tabs to that midi file. I’m still learning as I go with this program.

If you want to edit the end of the midi you just made into a fill, You can “ctrl C” copy or right click copy on the verse midi, paste it with " ctrl v" with the mouse at the start of Bar 10 and it will create a copy of the verse midi. you can then reduce this down to one bar and edit that bar to be a fill.
Attn: After doing this you must right click the new part and select consolidate or any edits to the new part will change the original part copied from.


Then I am going to create another copy of this Fill. I will turn one into the intro and one into the fill leading into the chorus.

Intro Fill.
To get this fill to export properly I had to relocate the part to the start of the track, select it then export to midi.


I am basing this fill on the fill in the video at 2:33. I will not be exporting this midi as it will be the start of the chorus fill.

Now its time to make the chorus beat. Once again I am going to make a copy of the verse beat and consolidate it and then edit for the chorus. This will save a bit of work starting from scratch.

Chorus starts off with Two Crash hits in a row. The ride cymbal is now being played instead of the open high hats so I have relocated the high hat notes up to the ride. I have increased the velocity of the ride to almost full because they are fairly quiet in the beatbuddy. There are ride notes played on the half measure so I will add them at a quieter velocity to accent the hits on the beat.


I tweaked the kick drum pattern a little and add a fill at the end of the fourth bar. Well not so much a fill but some crash hits and similar at the end of the eight bar with some snare hits. The chorus plays this through twice so I copy it and pasted and consolidated it to make it play twice. Then we have 4 bars after the chorus which I also copy and paste and then did some editing on it on the ride and end fill.

Post Chorus Fill

Chorus is now finished and we can export to midi. I will merge the chorus parts into one file. Hold shift and click on each part to select and highlight. Right click on any part and select “merge selected parts”


Now move the chorus to the start of the track so we can export. This is a pain in the ass but I don’t know any other way.


And last before adding bass to the song I want to create an outro that finishes with the Fill that leads into the chorus with a crash to finish. Come on you know what to do now.


And the song in beatbuddy manager looks like below and sounds like this

It’s time to add bass now. Since this thread is so big I will start a new thread.

Hey Stu, this is very cool, and I have to go thru step by step…, but need time for:(. Maybe at weekend.
Momentary Im stucking at trying to add "unsupported notes" to existing BB songs (since I found out how to "translate" them with my "Midi Event Processor", to make the BB control my Infinity...) But I cannot find out how to " add instrument " without sound (?) or add unsupported notes. Tried with Beatbuilder, Anvil studio and even Guitar Pro (5), but feel somhow foolish, dont know what to do.
But how I sayed, I found out, I can “translate” Midi notes and those can control my Infinity or even my Midi Controler (little Giant 2)

Beatbuilder won’t let you add notes for instruments that aren’t there. I’m sure that was a design decision to make using it simpler, for the most common use cases. Reaper and most others will allow it, though. Just find midi note 64, and put a bunch of notes there. If you load that into a song that has “with bass”, you’ll hear a bunch of low E notes :slight_smile:

@Guitar Stu – great tutorial! I guess I did skip over a bunch of steps on mine :slight_smile:

Huge thanx, will try it.

Awesome work Guitar Stu.

I use Reaper myself along with EzDrummer 2. If I get time, I might put up a tutorial similar to this with pictures (because I think my way is pretty easy). But in summary, this is what I do…

What you need:
Reaper
Ez Drummer 2
A midi device you can tap (I use the Akai LPD8)
A USB MIDI cable connected to the Beat Buddy

Getting Started:
Create a track and add EZDrummer 2 to the FX and add a Send to your USB MIDI cable connected to Beat Buddy. Arm the track for record and turn on the real time monitor. This will allow you to play the track MIDI and toggle between EZDrummer and your Beat Buddy to see how things sound (shift click EZ Drummer and it will toggle the enable/disable thus routing all MIDI to the Beat Buddy). Set the project BPM and open EZ Drummer 2.

Finding the right drums:
This is where EZ Drummer shines. Makes sure to add your Beat Buddy MIDI library to EZ Drummer First!
With EZ Drummer you can use the browser to find drums, but the real magic is the Tap to Find and the Song Builder. With the tap to find, just tap the beat in your midi device and EZ Drummer will find the closest match. When you find a good beat, you can drag the midi into the song creator and it will find other tracks that go well for various song parts - try it, it’s magical. If you find a part that’s from your Beat Buddy library, you can go ahead and drag that directly into the beat buddy manager (just drop it on a song part and it will work, no need to save it and import it).

But wait, Beat Buddy can’t play the extended MIDI drums that EZ Drummer has…
That’s true, you’ll need to edit them first. Drag the clip to your track in Reaper and double click it to open the MIDI editor. Change the view to show the note names and import the Beat Buddy MIDI mapping from here: http://mybeatbuddy.com/forum/index.php?threads/beatbuddy-drumsets-midi-notes-mapping.1873/.
Now look for notes that are not named (usually hi hats, crashes and sometimes the bass drum). Right click the note name on the left to select the row, then use CTRL + Up/Down to move the entire row to the Beat Buddy equivalent (or whatever you can find). Shift click EZ Drummer on the FX list to disable it (thus enabling routing to your Beat Buddy) then play the clip to see how it sounds (adjust as necessary).
Now you need to get it into Beat Buddy Manager. You can’t drag it directly from Reaper, so we need to get it back into EZ Drummer. So enable EZ Drummer (shift click), hold CTRL + ALT and drag the clip into the song area of EZDrummer (the area at the bottom). Then simply drag it into Beat Buddy Manager.

Hi Stu,
So I’m VERY new to this kind of material and I appreciate you trying to help people but I’m pretty lost with everything. I bought the BB under the idea that we can put together our own individual beats within the software using a drumkit, but that doesn’t seem to be the case. I followed your steps, but as soon as I got to the part where you’ve uploaded the Power Drum Kit it gets a little confusing. I’m not too familiar with drums, so I’m trying to get a handle on this software. It seemed like you were able to import one of the drum kits from the BB library and use it here, but it didn’t say how to. I’m really hoping there is an easier way to do this or else I’m pretty sure I’m going to fail miserably and have to return it. Basically I’m just asking if there’s anyway that BB helps with just putting a simple beat together without any external software.

Thanks,
Chris

Hi Chris. It took me awhile when working out how to do this so I appreciate how confusing it can be. It took some light bulbs to go off in my head for me to finally understand what was going on. The next version of beatbuddy manager is supposed to have a midi editor incorporated into it so lets hope it is easy to use and comes soon.

The Power drum kit is not a drum kit from beatbuddy manager but a stand alone drum kit that can be used with any number of programs. There are also pay kits like ezdrummer, superior drummer etc. These drums are designed to be used with DAW’s or if you like recording software which is what MuLab is. Other DAW’s are like protools, reaper, flstudio etc. In these recording programs you can use the midi editor and drum software to create yourself a drum track for your song instead of recording real live drums. With the beat buddy instead of creating full song drum tracks we break the drum track down into loops, fills, intro’s etc.

Cheers

Hi Stu,
I’m trying to make this song GOOD with bass from Better Than Ezra. I’ve got everything set up including Intro, Verse, Chorus, etc. all loaded in the BBpedal. My problem is, everytime I tap for Fill or Transition it doesn’t start on the right timing of the beat. How do I solved this one? Thanks…

Just a quick thought–and I apologize in advance if I’m off-base with this answer–but could it have anything to do with how your foot switch or pedal buttons are configured? I’m borrowing from @Rob22315 settings:
“2. Enabled the muted pause
3. Use the visual metronome ‘stopped and playing’ (comes with the beta firmware v1.74)
4. Have the dual momentary footswitch set up so that during playing, the left switch does the muted pause and the right switch does the Outro fill. We use a drum pause sometimes during songs so this is a great feature to have.
5. Have the momentary footswitch set up so that while stopped, the left switch moves back through the song list and the right switch moves forward through the song list. Our set lists are small and we usually know them 4-5 days beforehand so I will be able to set up my folder/set list beforehand then, when playing, use the pedal to move between songs when stopped.
6. Intro set to ‘Count in’ (the canned intros can be a little busy but I don’t find them as bad as some)
7. Default Tempo and Drumset enabled (I’ll set those up when I build my folder/set list)
8. Main Pedal Unpause - Tap is fill, Hold is stop song, Cue fill period 100%
9. Start beat - release
10. The rest are factory settings”

I’ll retreat back under my rock if this doesn’t help o_O

Thanks so much persist…

Nice tutorial, but its very lenghty :frowning:

Yea it is a bit lengthy but creating midi beats can have quite a steep learning curve. I had created them before but it took me a fair while for me to understand it and have it click. Now it’s very easy for me but I still remember trying to get my head around it.

It doesn’t help that there are alot of different programs that can be used to create midi’s and they all do things a little different. I only used this program in the thread because it is free and anyone can use it. I use Reaper normally and find it alot easier and more powerful.

I keep coming back to this tutorial for pointers ! much appreciated. :wink:

I guess I’m one of those morons that can’t even follow the tutorial. I can’t figure out how to select an instrument to load the VST plugin: "Back in the MuLab program we have to click on the instrument section in the top right corner, In the menu then select VST " I don;t have that text to the left of the keyboard and to the right of the CPU meter in my version of MuLab

You aren’t the only one FLR …lol
I had to try my old cakewalk software to figure it out … it’s easy …(if the instruments go to the right places)
watch this video for some ‘tips’ … good luck
http://mybeatbuddy.com/forum/index.php?threads/bb-w-bass-lines-video-tutorial-using-cakewalk-software-w-bb-16-0.5279/

So, I have created a basic song beat loop with mulab…exported song to midi…put in in my download files…opened BB and created new folder, created new song…exported my new song into the main loop…named it, picked the vintage kit, did everything correctly …saved the new song. Pressed play and the visual metronome in BB shows it is playing , BUT I’m not getting any sound…looks like all is good, it was an easy process, but NO sound…what is wrong? Help !!!