Greetings BeatBuddies!!!
We have a major announcement, the BeatBuddy 2 is officially released!

The BeatBuddy 2 is the sequel to the world’s first pedal drum machine that enables musicians to easily control the beat hands-free. Just by pressing a button, you can start a beat, insert fills, transition from verse to chorus, throw in drum breaks (pauses), trigger accent hits (such as hand claps or cymbal crashes) and more! It is the closest thing to having a real drummer, right at your feet!
We’re beyond excited for you to explore all the new features that come with the BeatBuddy 2, like:
-
Autopilot
-
HD Drum Set support (450MB max size)
-
Multiswitch Support (Footswitch +, EXP, and SuperSwitch)
-
Dynamic Control
-
And more!
Watch this video to find out more:

Read the BeatBuddy 2 Manual here:
BeatBuddy 2 Official Manual_rev 5.pdf (6.3 MB)
BeatBuddy 2 Official Manual_rev 5_PRINTER.pdf (15.6 MB)
Update to the latest official firmware v1.0.0 here

Follow these steps to update your BeatBuddy 2:
- Download the latest firmware .zip from the website or the forum
- Unzip and open the enclosing folder
- Copy and paste / drag and drop all of the files inside the folder into the BeatBuddy 2’s formatted SD card
- If your computer says that the files already exist, replace all of them, do not merge
- Insert the SD card
- Connect your BeatBuddy 2 to a power source and power on
- Once powered on, if you placed the update files correctly on the SD card the BeatBuddy 2 screen will read “Updating Firmware” this will take a few moments
- DO NOT unplug the BeatBuddy 2 nor remove the SD card while it is updating the Firmware, this will BRICK YOUR UNIT, if you encounter any issues while updating please reach out to support@singularsound.com at your earliest convenience
- Confirm the update in the settings in ‘About BeatBuddy’ menu
Autopilot
This mode can only be used when songs have been pre-programmed in the BeatBuddy Manager Online, or if you are using pre-programmed Beat Boutique content. If you purchased Beat Boutique content before you bought the BeatBuddy 2, you may have a new update available for download on our website.
Make sure Autopilot is enabled in the settings menu by pressing the Drum Set and Tempo knobs simultaneously. Go to Settings (Playback > Autopilot) to enable/disable the mode.
What is Autopilot?
Autopilot allows you to perform highly complex song arrangements with a single press of the pedal while still letting you interact with the pedal. When the feature is enabled, the screen will read “Autopilot On” within the beat counter while stopped, and you will see the Autopilot icon above the measure counter while playing or paused.
Just press the pedal once and focus on your playing! This setting will only affect songs that were programmed to work with the Autopilot mode. These autopilot songs can be purchased in the Beat Boutique or any song can be edited (in the BBMO) to have autopilot activated. The BeatBuddy 2 will take care of playing all the drum parts in order automatically for the entirety of the song. This means you don’t have to hold the pedal down to transition as it plays or time a fill perfectly for a cover song. This gives the BeatBuddy 2 the benefits of a backing track with the added benefits of an interactive BeatBuddy experience.
Using Autopilot
Each main section plays for the set number of measures. You can see the length of sections as shown in the measure counter:
If a section has more than 8 measures in its count, it will have pages.
An autopilot song will transition to the next song part automatically when the playback reaches the measure on the right end of the screen (or on the last measure of the last page for that part if there are pages). If any drum fills were pre-programmed, they will also play on their own.
This means:
-
The song will automatically transition from one section to the next, playing any programmed transition fills along the way.
-
The song will play fills where they were programmed to play
-
The song will stop and play the outro if there is one
- You can also have a song set to loop back around to the beginning of the song instead of stopping.
This is all set in the BeatBuddy Manager Online (on version 2.0.0 or later). For the time being, the BBMO v2.0.x is only available on the beta site. Read more about the BeatBuddy Manager Beta here.
Interacting with Autopilot Live
To extend a section, press the Master Control to trigger a fill (or send a MIDI fill command, read more in the BBMO manual). Once the fill has finished playing, the bar count for that section resets, and the part starts again from the beginning (note: you could repeat a section this way as many times as you’d like). This is great for repeating solo sections and impromptu live changes to the song form.
- Note: If there is no drum fill loaded into the song, the measure marker will simply restart on the same song part after pressing the pedal once it completes the current measure. This will happen without hearing a fill.
You can also extend a section by pausing and unpausing the beat. When unpaused, the beat will start at the beginning of the current song part.
To shorten or skip a section, manually trigger a transition fill by holding down the pedal or sending a transition command (via footswitch or MIDI). You can still play the transition for as long as you want by continuing to hold the pedal down.
The song will end as it is programmed to. You can also end it at any time by starting the outro fill (double tap of the Master Control). To avoid ending a song at a set point, either trigger a fill to extend that section (single tap of the Master Control) or trigger a transition to the beginning of the song (press and hold of the Master Control). These actions can all be triggered via MIDI.
Setting Up an Autopilot Song (BBMO)
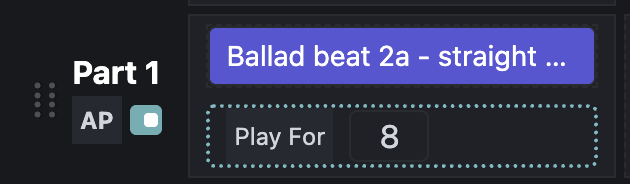
You will need to use the BeatBuddy Manager Online (BBMO) to set up an autopilot song. Turn the Autopilot setting for the whole song on in the top right corner of the BBMO editor. Make sure the song part is set to have autopilot enabled.
Play For Value (Main Beat and Transition Fills)
Set the AP Play For value for the song part to the total number of measures for a section. If there is a transition fill, the fill will begin to play in its entirety in reference to the total number of measures set for autopilot. For example, if the song part is set to Play For 32 measures, and the transition in the song part is 1 measure long, the transition would start at the beginning of measure 32.

Play At Value (Fills)
For Fills, you can set a Play At autopilot value, which tells the fill to play at a specific measure. In our same example of 32 measures, you could have 8 fills (max) set to play in that part at measures 2, 4, 8, 12, 16, 20, 24, and 30
These fills playing will not restart the count of the autopilot, only interacting to manually play a fill would do this. It is not allowed to have a song part with both shuffle and autopilot enabled. If the song part has autopilot enabled, the shuffle setting for fills is ignored.
Manual-Only Fills
You can also have the fills Play At value set to 0. This means it will not automatically be triggered by autopilot, but you can manually trigger the fill yourself. You can have a combination of fills with Play At values above 0 (which will get triggered by autopilot at the corresponding measure) and fills with Play At values set to 0 (which will only be triggered when you decide to).
Per-part AP Setting
By disabling a part’s AP, you can have the benefits of AP in specific song parts, without sacrificing the BeatBuddy 2’s interactive experience. A song part with AP disabled in an AP enabled song will behave like a normal BeatBuddy song, all automation will be off.
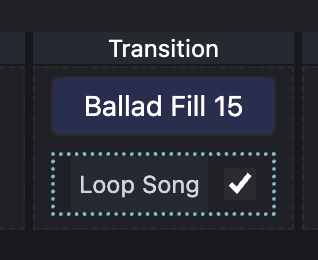
Play After (Last Part, Loop Song, and Outro)
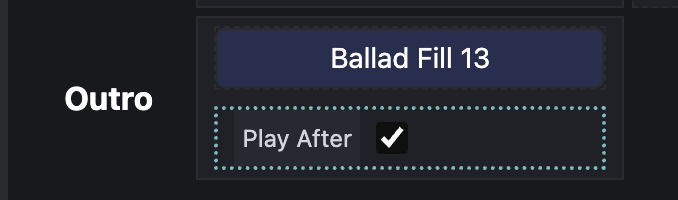
The last part’s transition has an extra option to loop the song back around to start from the beginning instead of stopping/playing the outro.
If Loop Song is enabled, the song will not play the outro and will start the song over from the first part.
If an outro exists, it will start playing either before or after the end of the AP Count for the last song part, depending on the Play After setting for the outro. If play after is enabled, it will play the outro after the last part plays fully. If play after is disabled, it will play the outro before the end of the last part’s AP count.
-
For example, if the last song part is set to Play For 32 measures, and the outro is 1 measure long
-
With Play After enabled, the outro would start at the beginning of the 33rd measure.
-
with Play After disabled, the outro would start at the beginning of measure 32.
-
Dynamic Control
Show image of this on BeatBuddy 2
Fully control the dynamics of the BeatBuddy Live with an Expression pedal or by using MIDI (CC:78 to increase and CC:79 to decrease). The Dynamic Control expression pedal must be set to Dynamic Control (Multiswitch 1 or 2 > Expression Pedal > Gear Menu > Behavior).
Once set, you can offset the velocity values of the currently open song’s MIDI files, which makes the BeatBuddy change the dynamics of the playback. This is different than changing the volume, because most drum sets on the BeatBuddy 2 trigger different hits at different velocities. These other samples are grouped into ranges of velocities that have their own timbre.
This can sound just like when a drummer starts to hit the drums quieter or louder live for dynamic effect. You can take this to the next level with our brand new Beat Boutique HD drum sets, the BeatBuddy 2 can handle a drum set up to 450 MB in size, which is more than 4x the maximum of its predecessor.
Minimum and Maximum Velocity
The range of the Dynamic Control can also be defined. The minimum value represents the lowest velocity value a MIDI note can be moved to by the Dynamic Control feature. The maximum value represents the highest velocity value a MIDI note can be moved to by the Dynamic Control feature
For example:
-
If your minimum is 60, and you have a note set to velocity of 80. Say the offset is -30, this means that the velocity of that note will not go lower than velocity 60.
-
If your maximum is 120 and you have a note set to velocity 115. Say the offset is +30, this means that the velocity of that note will not go higher than velocity 120.
Any note with a velocity lower than the minimum will not be affected by decreasing the offset. Any note with a velocity higher than the maximum will not be affected by increasing the offset.
The BeatBuddy 2 will show the dynamic control and its current value on screen while it is being applied.
HD Drum Sets
Drum Sets got a revamp for BeatBuddy 2, you can find all of the available HD Drum Sets on our website, in the Beat Boutique.
Previously, files for drum sets were only available up to 100MB in size, but now the BeatBuddy 2 can load drum set files that are up to 450MB in size! All drum sets will still be purchasable in .DRM file format, but a new HD option called .DRMX will be available for purchase on our website. HD drum sets can also have up to 32 individual samples per instrument, non-HD kits are limited to 16 samples per instrument.
These HD versions of kits (.DRMX files) will utilize extra samples we record in the studio when creating the samples for the content, increasing the dynamic power of the BeatBuddy 2’s playback algorithm.
.DRMX files are not compatible with the original BeatBuddy, and can only be edited and created using the BeatBuddy Manager Online (BBMO) application.
Any .DRM file can be converted into a .DRMX file and more sounds can be added into it. On the BeatBuddy 2 and on the BBMO, .DRMX files will have an HD icon to find them easily.
The SuperSwitch

The SuperSwitch opens new possibilities for controlling your Aeros and BeatBuddy 2. Set each button’s function independently in the other product’s settings menus. Then, use it to play fills and transitions on the BeatBuddy 2, or to open and close the mixer on the Aeros, with so many more options available! Featuring whisper-quiet buttons with a sleek metal casing, the SuperSwitch is designed to withstand heavy use and provide a rock-solid performance.
By default, neither multiswitch port is set to use the Superswitch, but either multiswitch port can be set to use it. You must manually set the multiswitch port to use the SuperSwitch in the multiswitch settings menu. Change the behaviors of the 6 external footswitches using the Superswitch gear menu.
Get yours at: singularsound.com/superswitch
The SuperSwitch button defaults on the BeatBuddy 2 are:
Switch 1
While Playing - Accent Hit
While Paused - Accent Hit
While Stopped - Accent Hit
Switch 2
While Playing - Previous Part
While Paused - Previous Part
While Stopped - Previous Part
Switch 3
While Playing - Next Part
While Paused - Next Part
While Stopped - Next Part
Switch 4
While Playing - Half Time
While Paused - Half Time
While Stopped - Song Advance (next song in folder)
Switch 5
While Playing - Double Time
While Paused - Double Time
While Stopped - Tap Tempo
Switch 6
While Playing - Outro
While Paused - Instant Stop (stops immediately with no outro)
While Stopped - Go to Folders (goes to song folders list)
The Beat Boutique

Professionally produced additional beats and drum sets can be purchased and downloaded from Singular Sound’s Beat Boutique Library at singularsound.com/beat-boutique, and free user-created songs and drum sets can be found on the forum at https://forum.singularsound.com.
You would use the BeatBuddy Manager Online to add these files to your BeatBuddy 2 project
All BeatBuddy beats of artist cover songs sold in the Beat Boutique will have Autopilot set for you to use immediately on your BeatBuddy 2. If you purchased your content before the BeatBuddy2 was released, make sure you download the latest version from our website downloader.
HD drum sets can be purchased optionally when purchasing a drum set, if you purchase an HD .drmx drum set, you will also be able to download the non-HD .drm version.
HD .DRMX drum sets are able to hold up to 450MB and so they will have more samples for greater granularity of sound and also some completely new instruments for you to experiment with.